
We decided to take an alternative approach.
Our backup software operates independently from the data servers, without utilizing an agent, and functions autonomously on the host while remaining separate from the servers.
Synergy HyperV Backup is a backup application with some unique features:
 No Agent Required: Synergy HyperV Backup operates directly on HyperV, eliminating the need for an agent to connect to your server. This ensures that your backups are completely segmented, separated, and isolated from your VM servers, making them inaccessible to malware.
 Offline Disks: Back up your data to a disk and set it to offline mode, ensuring that malware cannot access or infect it.
 In-HyperV GUI: Enjoy the convenience of a user-friendly graphical interface within HyperV, making it easier to manage your backups.
 Centralized Task Management: Perform all necessary tasks directly from within HyperV for a streamlined backup experience.
 Multiple Profiles: Manage multiple profiles for your VM backups using a single form, simplifying the backup process.
 Intuitive Scheduling: Effortlessly create backup schedules within the application, eliminating the need for command line input.
 Version Compatibility: Synergy HyperV Backup is compatible with 2012, 2012R2, 2016, 2019, 2022 and 2025 Server versions.
 Online Backups: Take backups without stopping or pausing your VMs, ensuring seamless operation.
 Retention Versions: Maintain up to 9 retention versions of each backup for added security.
 Automatic Offline Backup: Benefit from an automatic offline backup after the completion of your first backup.
 Amazon S3 Integration: Upload your backups to an Amazon S3 bucket for additional storage and protection.
 Script Command Execution: Execute script commands before and after your backup execution for customized backup processes.
 Email Notifications: Receive email notifications after the execution of each backup to stay informed and updated.
Auditing: Audit your backups and keep a separate Audit Log for review purposes.
Videos Playlist


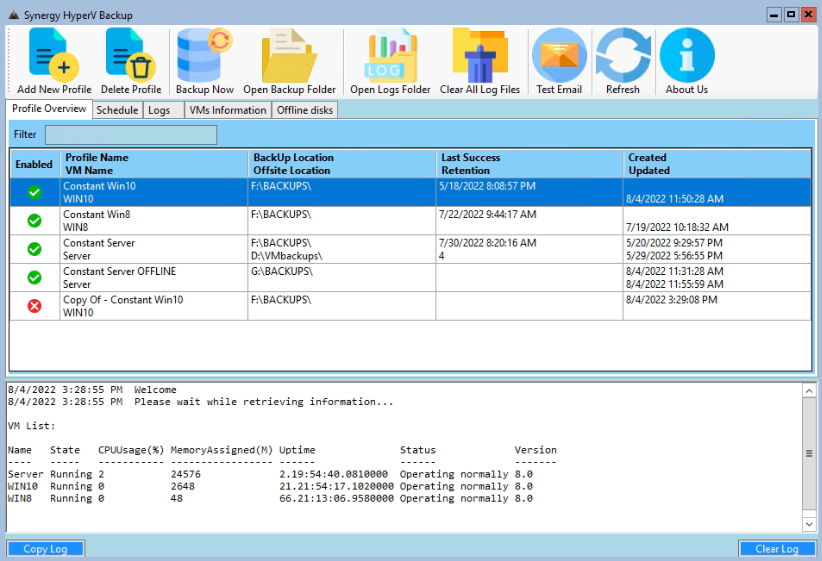
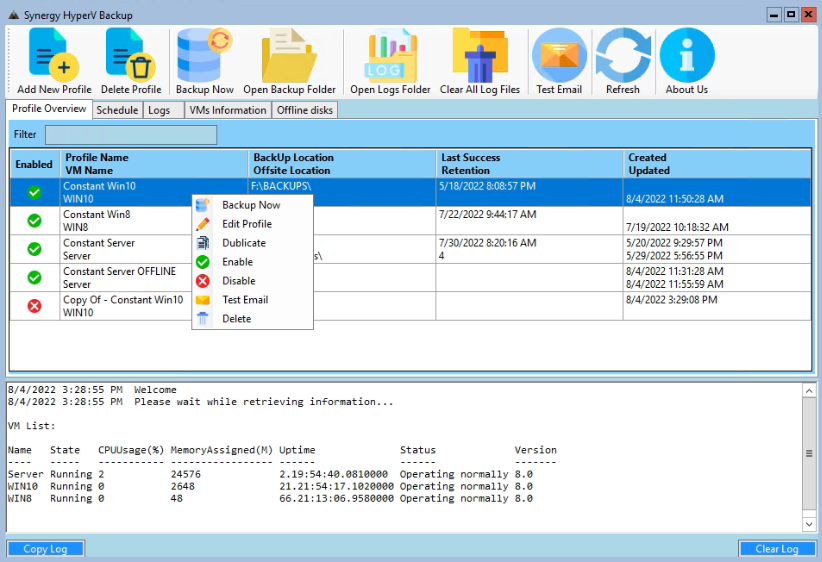
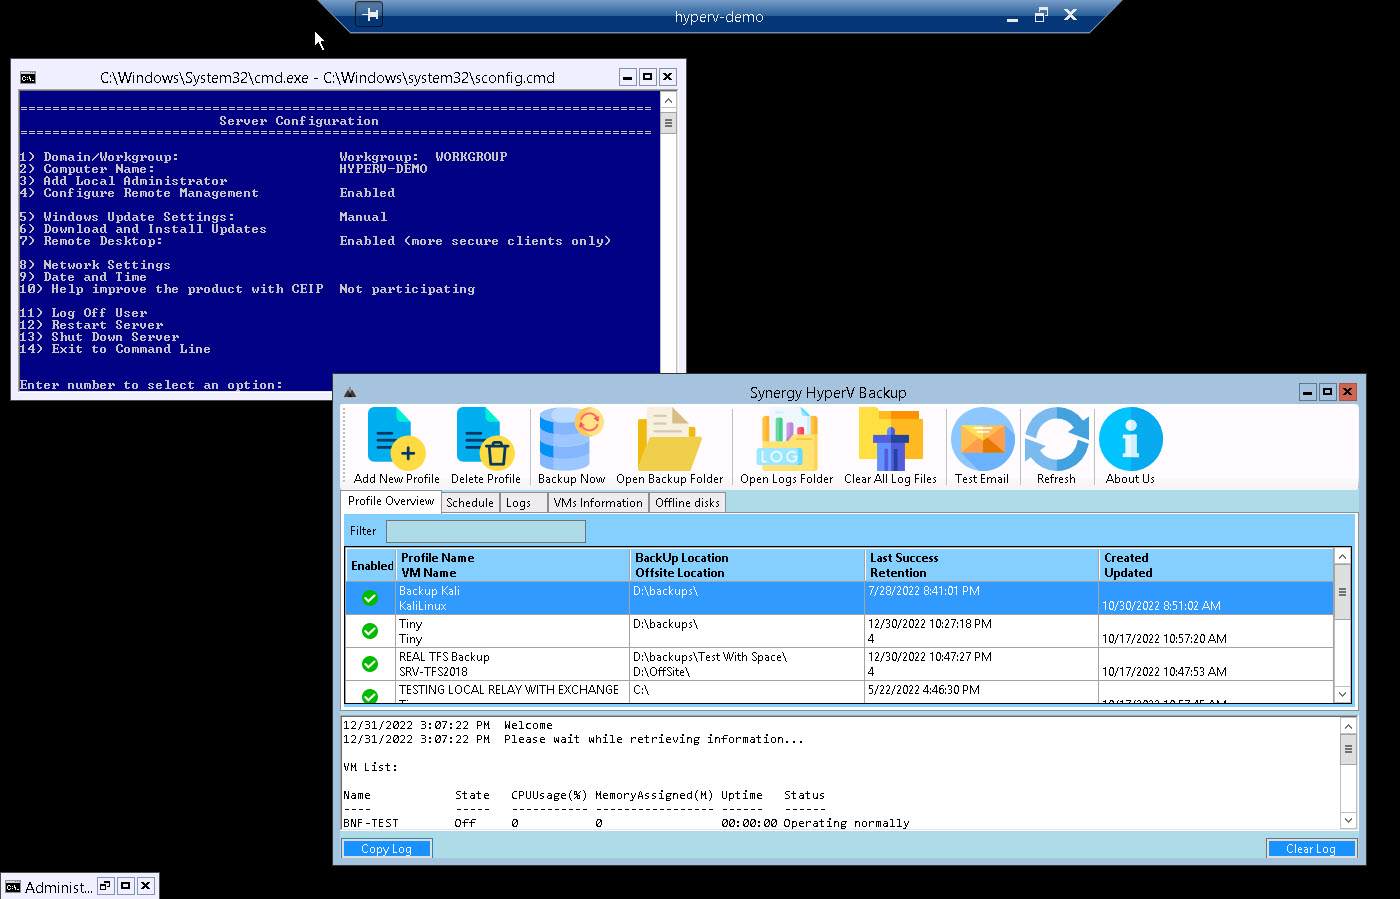
Main Form and list of Backup Profiles
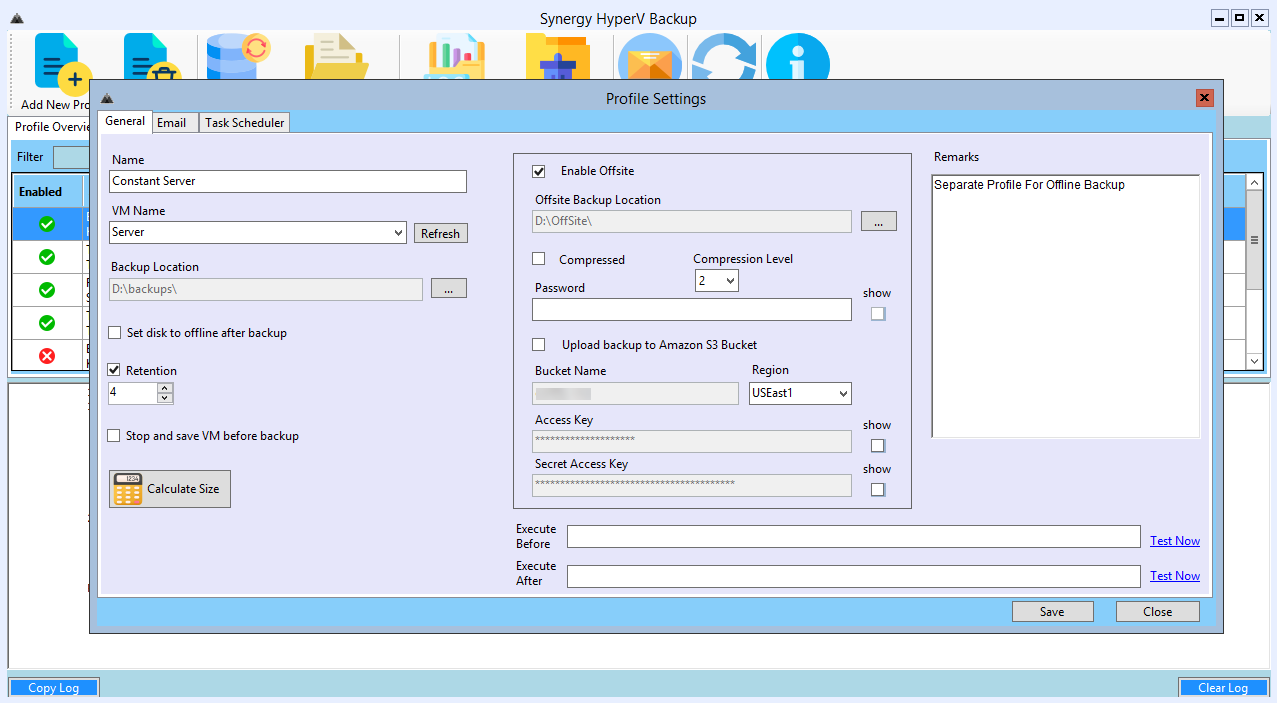
A backup profile with 4 retention copies and an Offsite backup to another location
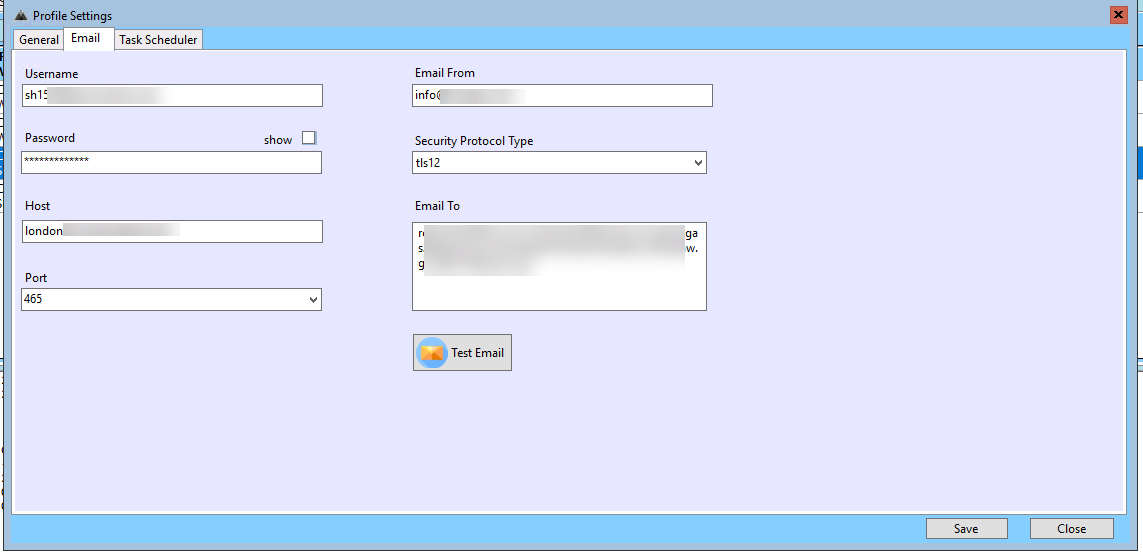
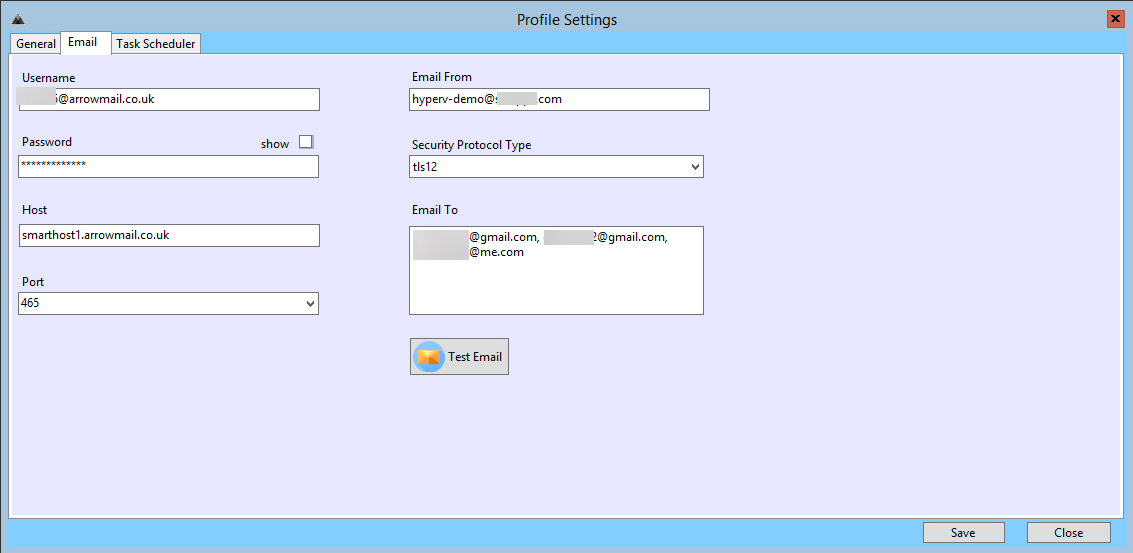
Email details for this Profile
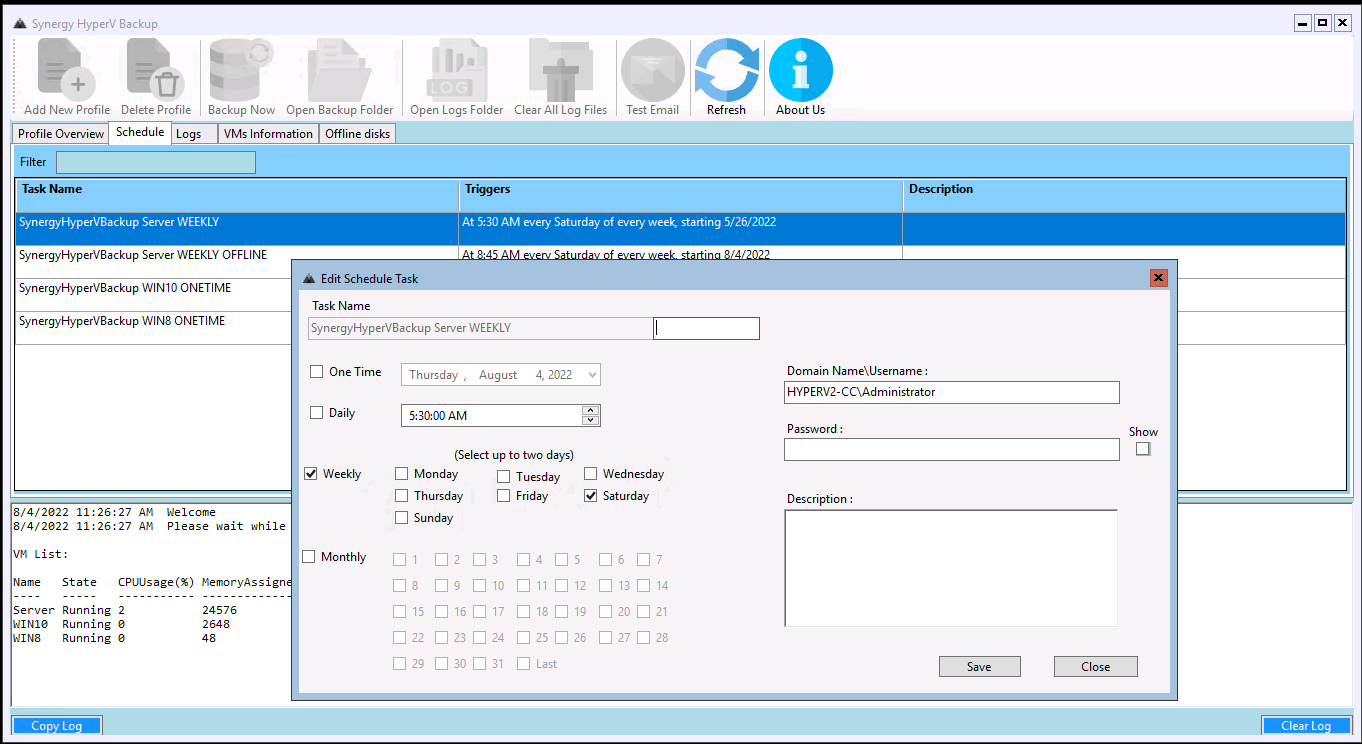
Schedule details for the same profile

A backup of the same server but using Offline mode

In this mode, the disk is always offline. Before the backup we bring the disk online, take the backup and then put it back in offline mode.
So this backup is invisible to any malware
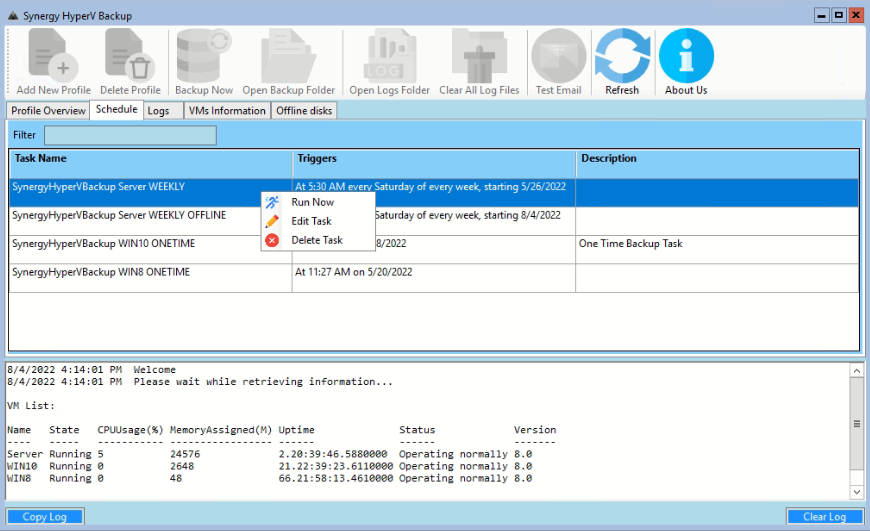
Schedules tab
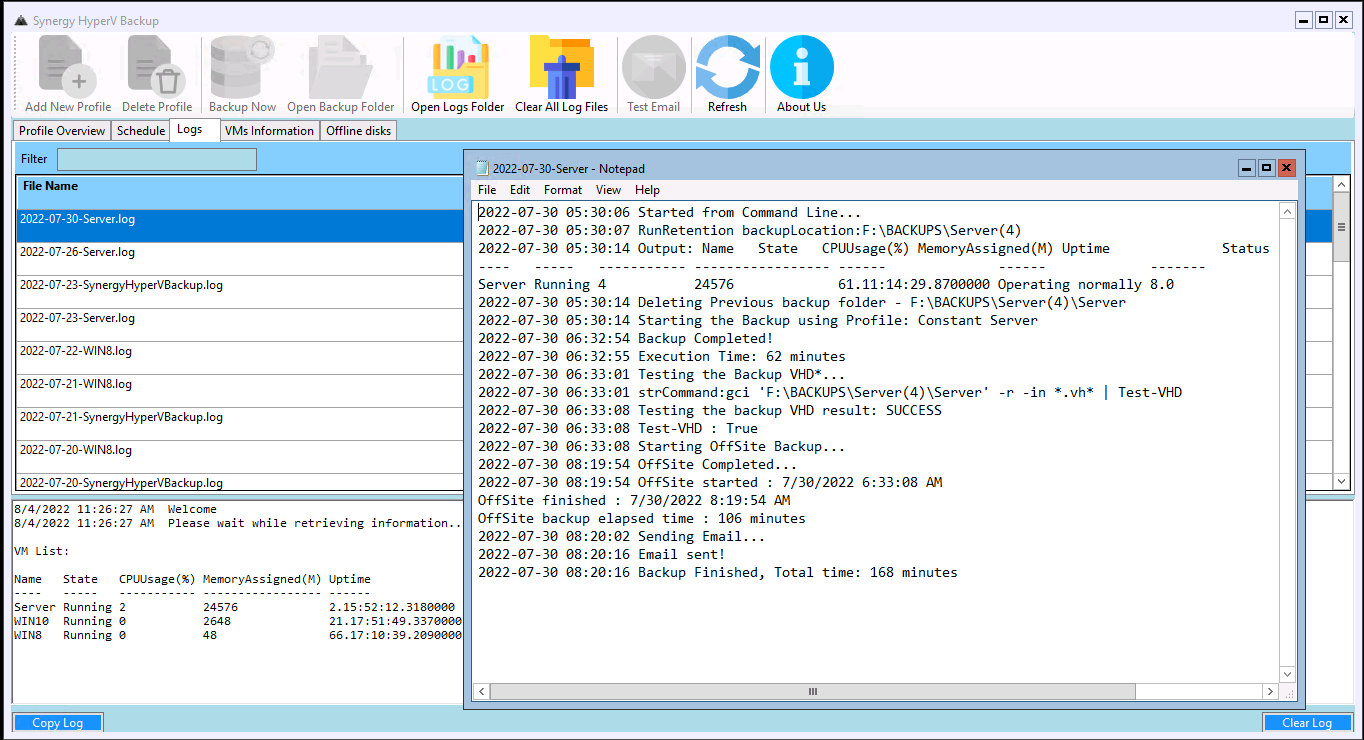
The Logs tab
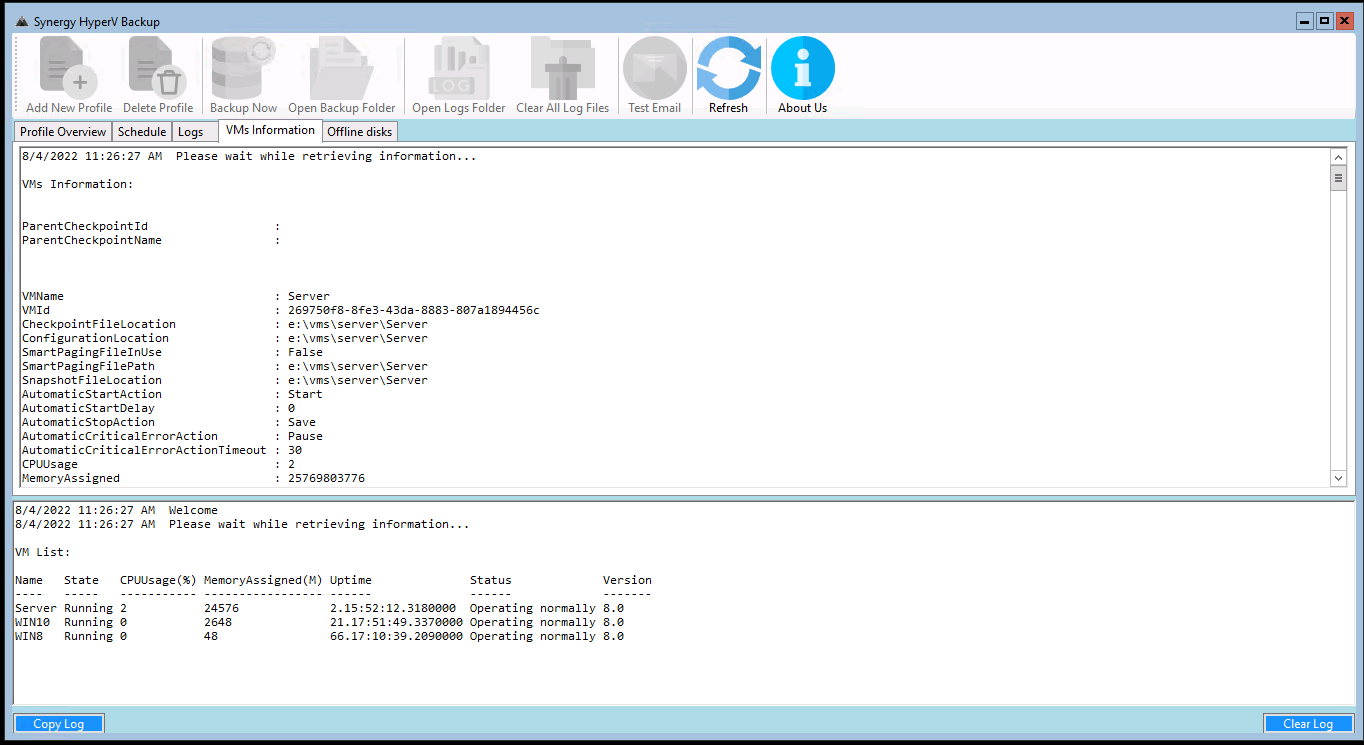
Information about all VMs on the server
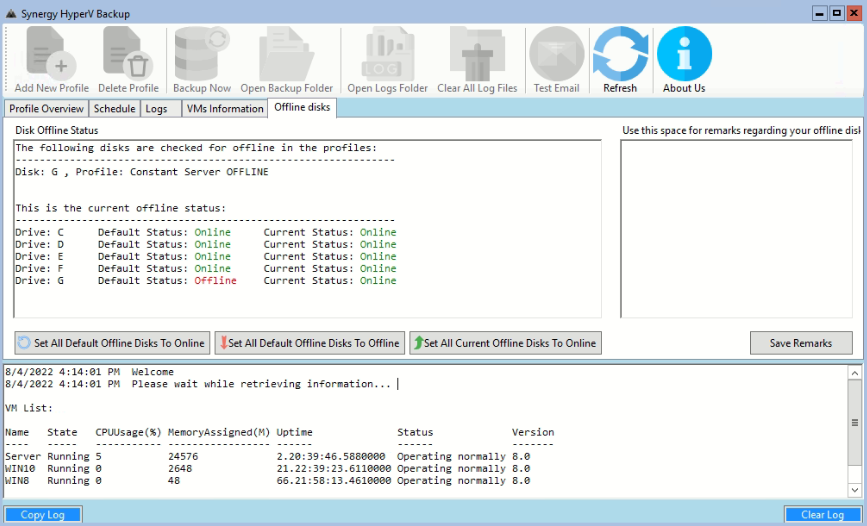
Offline Disks Tab
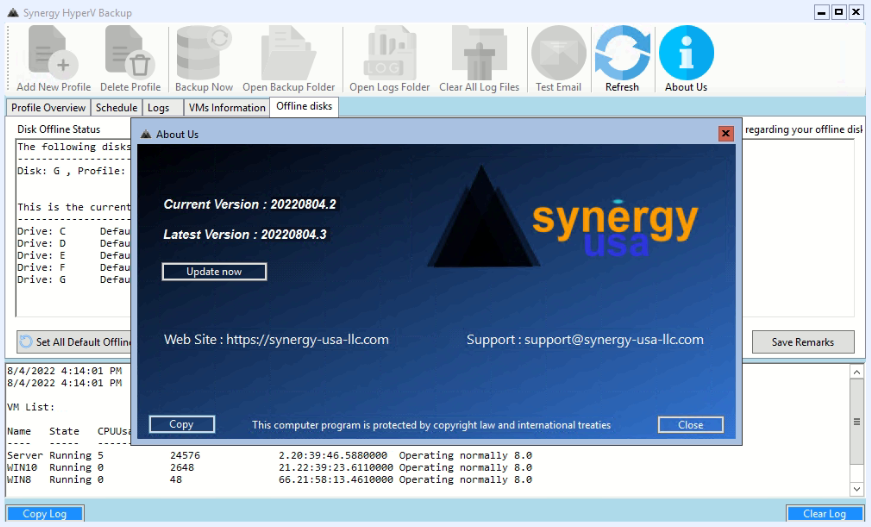
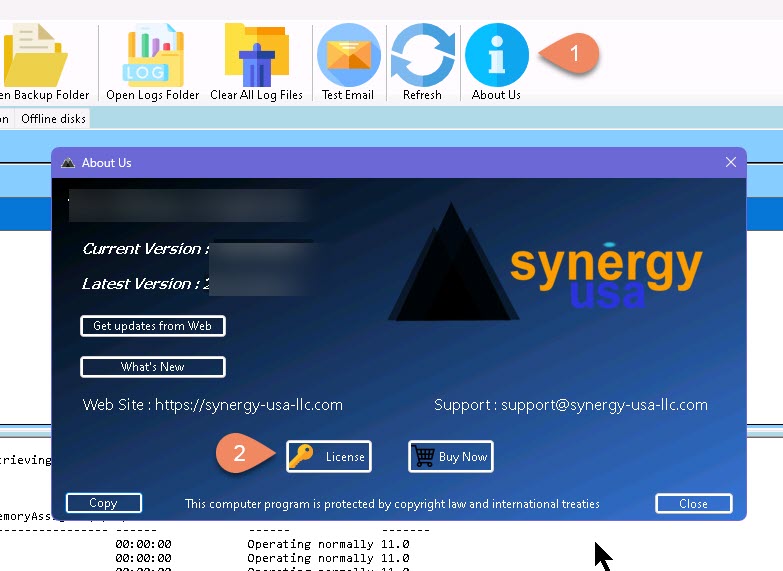
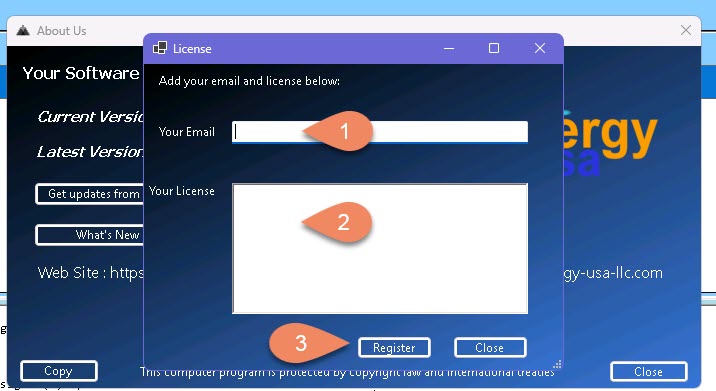
Updating is performed from within the application
This is a sample of an email sent after backup was completed:
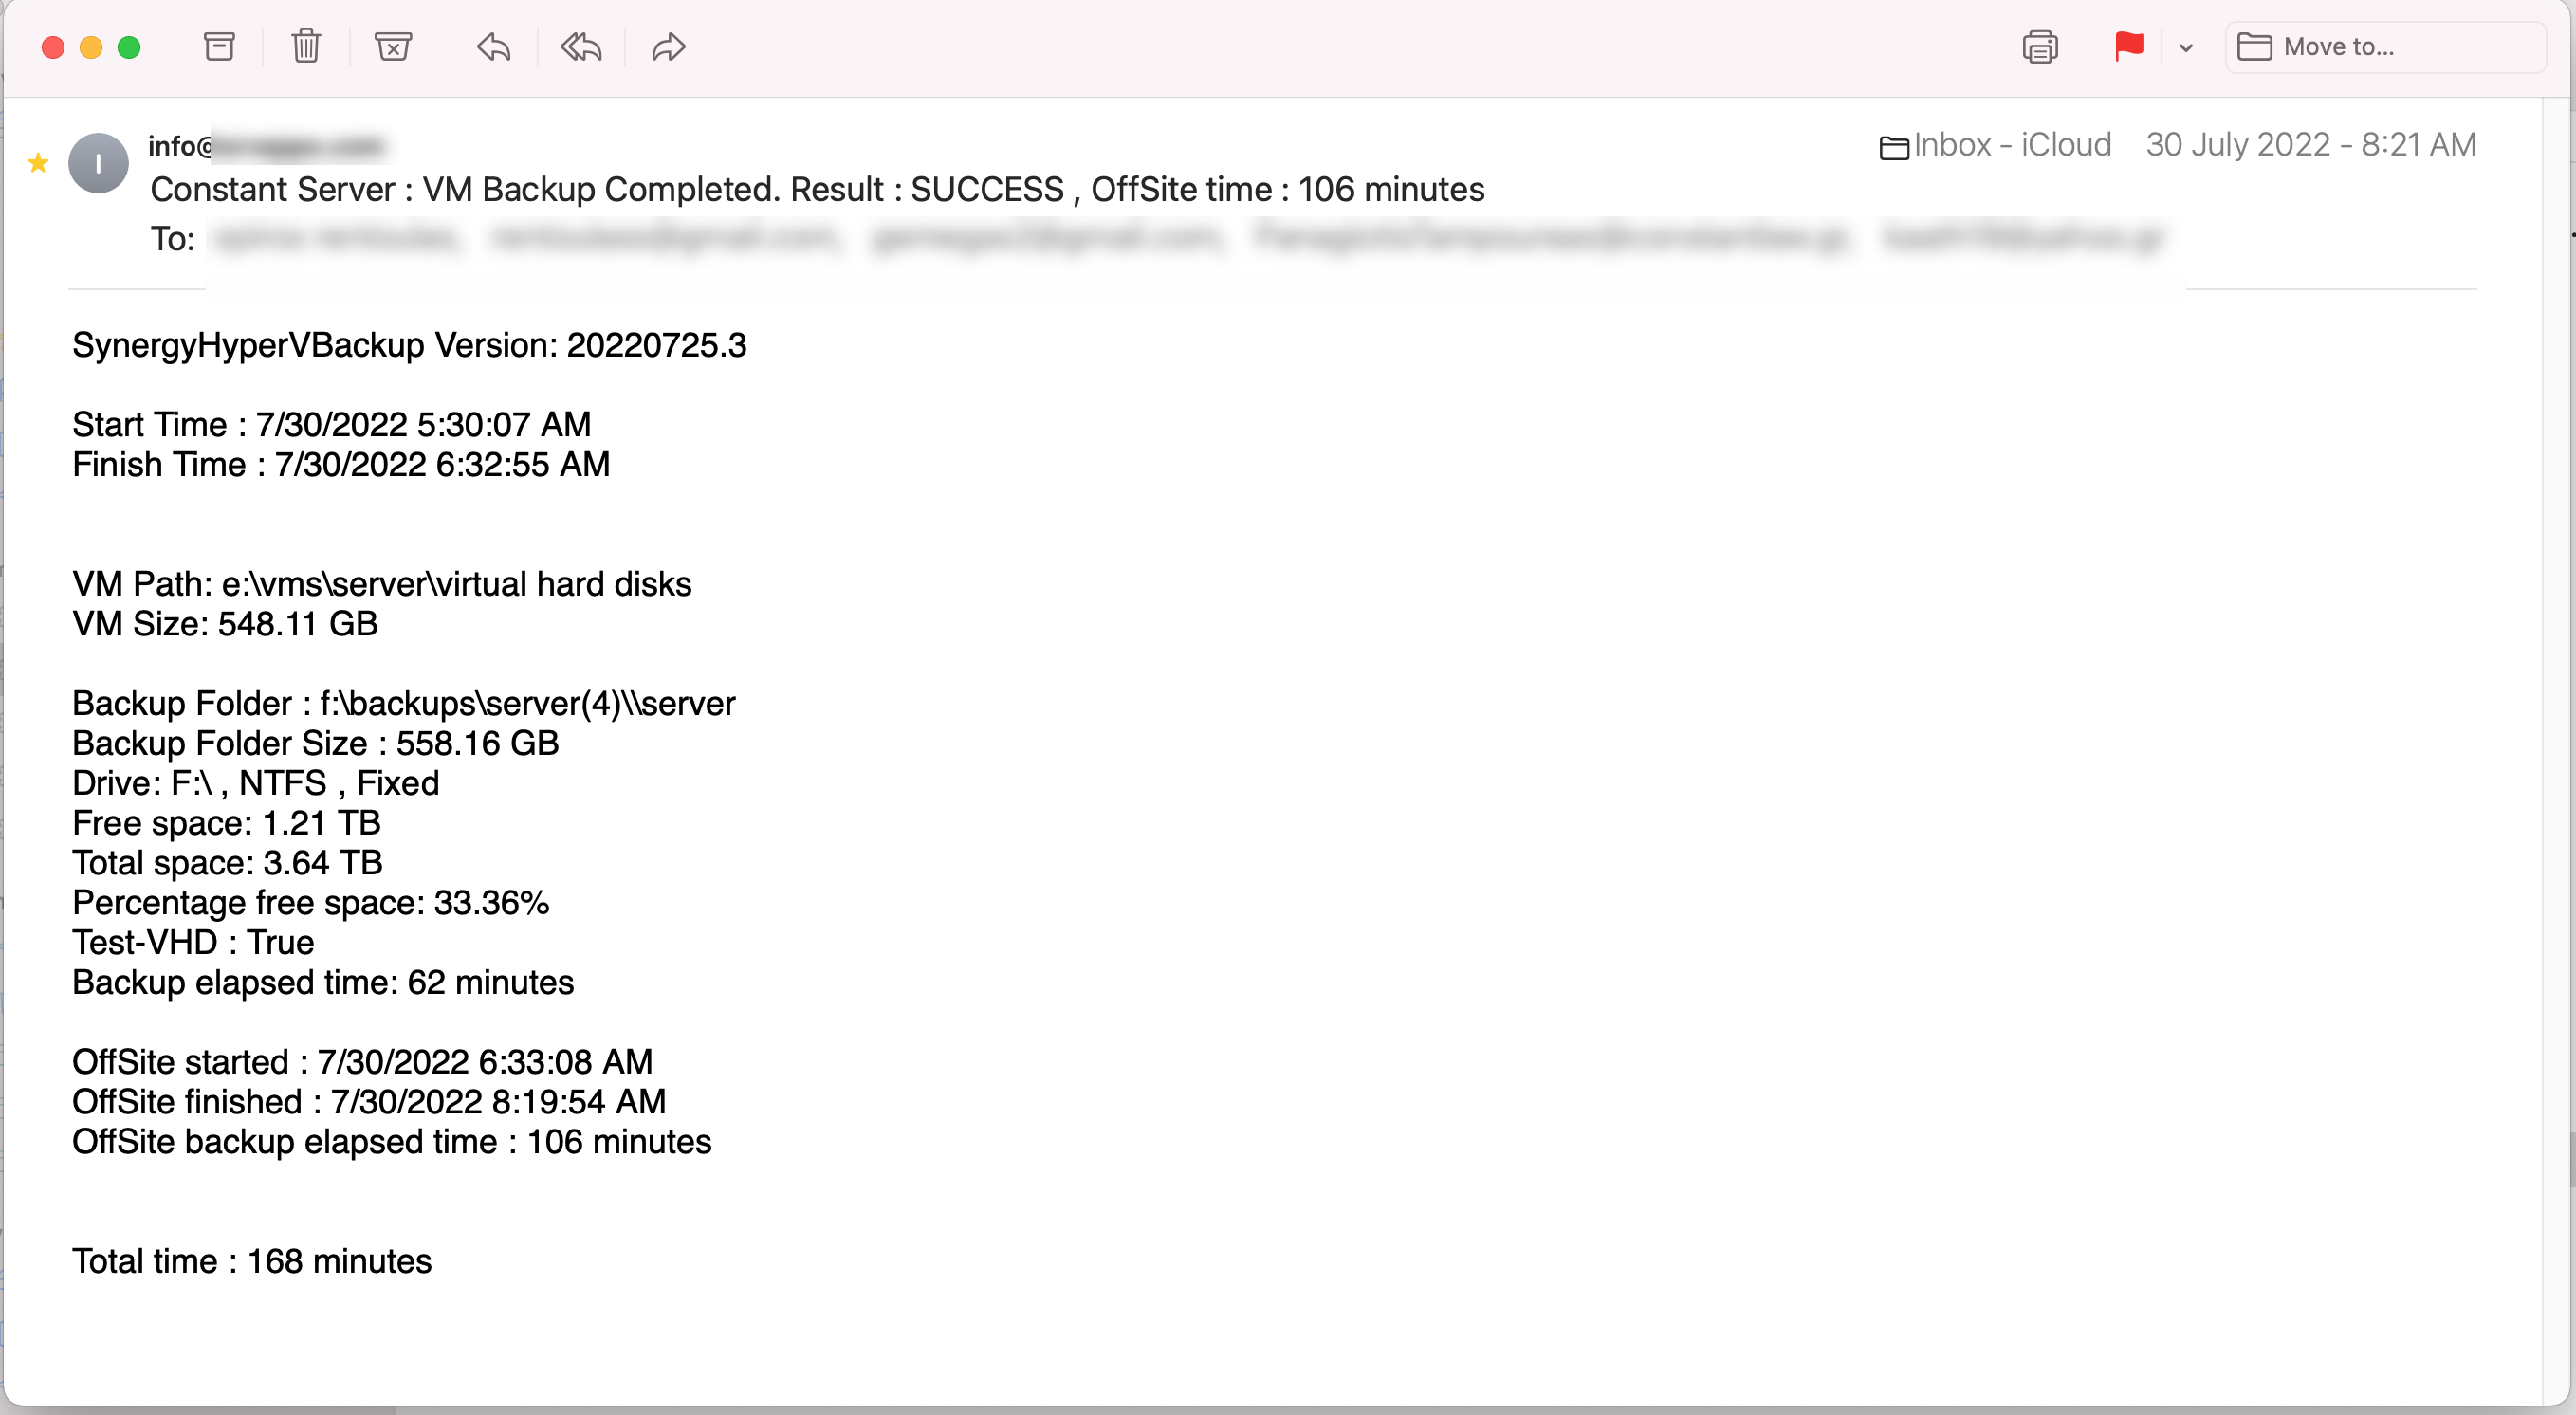
Easily check backup status from your mailbox:

Hyper-V is a Microsoft hypervisor that enables native virtualization on x86-64 systems. It allows multiple operating systems to run on a single physical server, in isolation from one another, by creating virtual machines (VMs). Hyper-V provides a virtualized set of hardware to the guest operating system, which can run its own operating system. Hyper-V can be used to create and manage virtual machines and their resources, including storage, networking, and memory. It also includes a variety of management and monitoring tools for administrators to use.
For those who may not be familiar with the distinction between type 1 and type 2 hypervisors, here’s a brief explanation:
Type 1 hypervisors, such as VMware ESXi, Citrix XenServer, and Microsoft Hyper-V, function like a low-footprint operating system and run directly on the host computer’s hardware. They are often referred to as “bare metal” or “native” hypervisors, and are typically used for production-ready virtualization in data centers.
Type 2 hypervisors, like VMware Player, Oracle VirtualBox, and Parallels Desktop, run as a software layer on an operating system, similar to other computer programs. They are also known as “hosted” hypervisors and allow end users to run virtual machines on personal computers, making them ideal for training, development, and research purposes.
Many administrators are unsure if Hyper-V is a type 1 or type 2 hypervisor due to its appearance of running on top of the operating system. However, this is not the case. Hyper-V is actually a type 1 or “bare metal” hypervisor. This is because when the Hyper-V role or feature is installed or enabled on a system, the original operating system is converted into a virtual machine and a layer of Hyper-V hypervisor is added underneath it. This is the reason why the system restarts when the Hyper-V role or feature is installed. After restart, the original Windows operating system operates as a virtual machine on top of the Hyper-V hypervisor. In short, Hyper-V functions as a type 1 hypervisor under the hood.
Hyper-V is often mistaken as a type 2 hypervisor due to its appearance of running on top of the operating system. However, when the Hyper-V role or feature is installed or enabled on a system, the original operating system is transformed into a virtual machine and a layer of Hyper-V hypervisor is installed beneath it. This is why the system needs to be restarted during the installation process. Once restarted, the original operating system functions as a virtual machine on top of the Hyper-V hypervisor, making it a type 1 or bare metal hypervisor.
Up to Version 2019 yes it’s free. You can download an ISO file from Microsoft, boot with it on your physical server and then setup Hyper-V as usual.
As of Jan/2023 there is no free 2022 version.
However you can download a windows 2022 evaluation ISO, install on a physical server the Core edition and add the Hyper-V as a feature using the following powershell command:
Install-WindowsFeature -Name Hyper-V -IncludeManagementTools -Restart
Check this really interesting article:
How to Install Hyper-V on Windows Server Core
Yes we have tried the application with Server 2022 Datacenter version on AWS using the metal instance. Check our videos for examples.
Yes
After a backup is finished it can upload a copy to your AWS bucket.
It’s a full working version that allows you to backup just one instance of an application.
Updating is also disabled.
From HyperV Console start a Powershell session:
Create a new folder:
md \SynergyHyperVBackup
Change to the folder:
cd SynergyHyperVBackup
Download demo:
Invoke-WebRequest -uri synergy-usa-llc.com/various/SynergyHyperVBackup.zip -outfile SynergyHyperVBackup.zip
How to unzip downloaded file
Expand-Archive .\SynergyHyperVBackup.zip
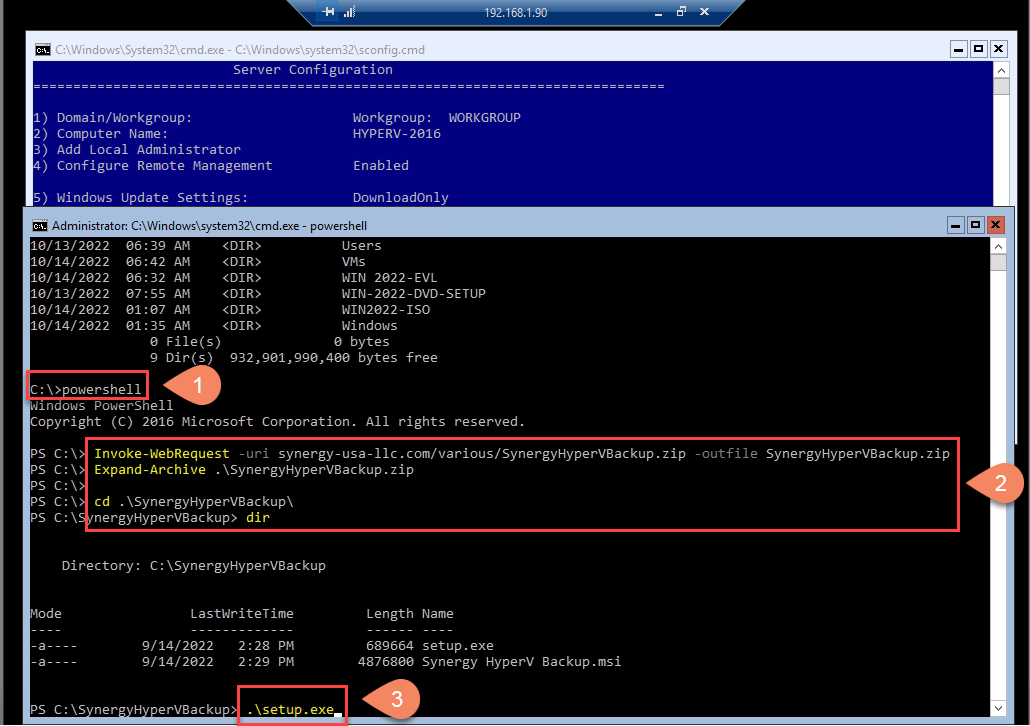
After downloading and expanding the archive, change to SynergyHyperVBackup folder and run the Setup.exe.
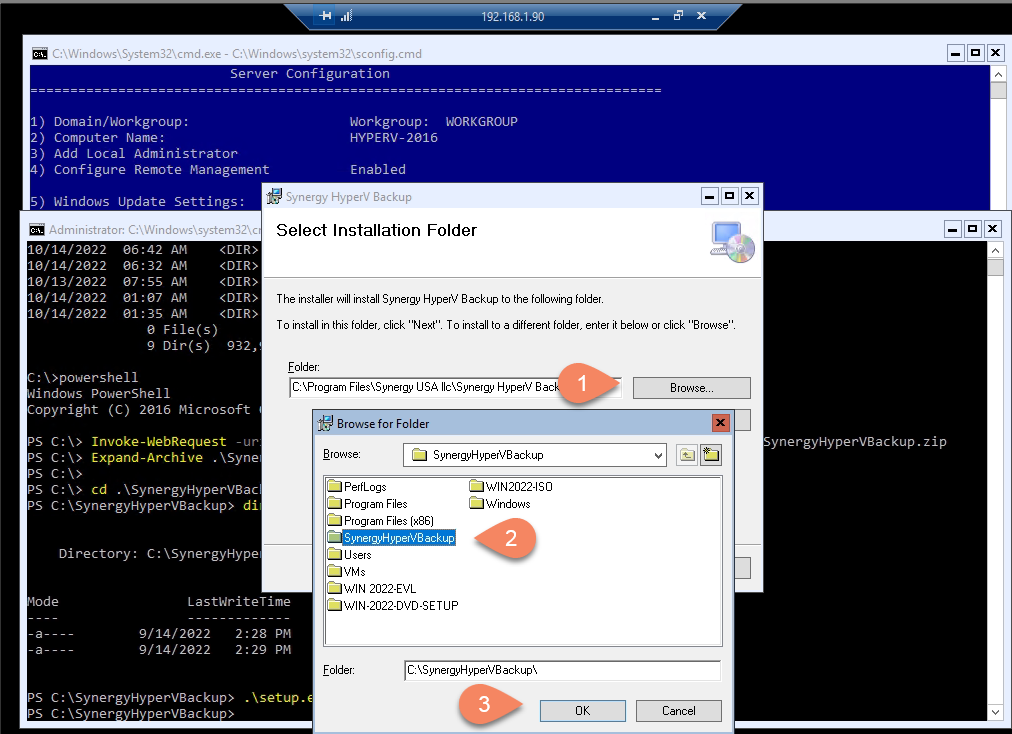
We suggest to change setup location to c:\SynergyHyperVBackup , it will be easier this way for you to run the application.
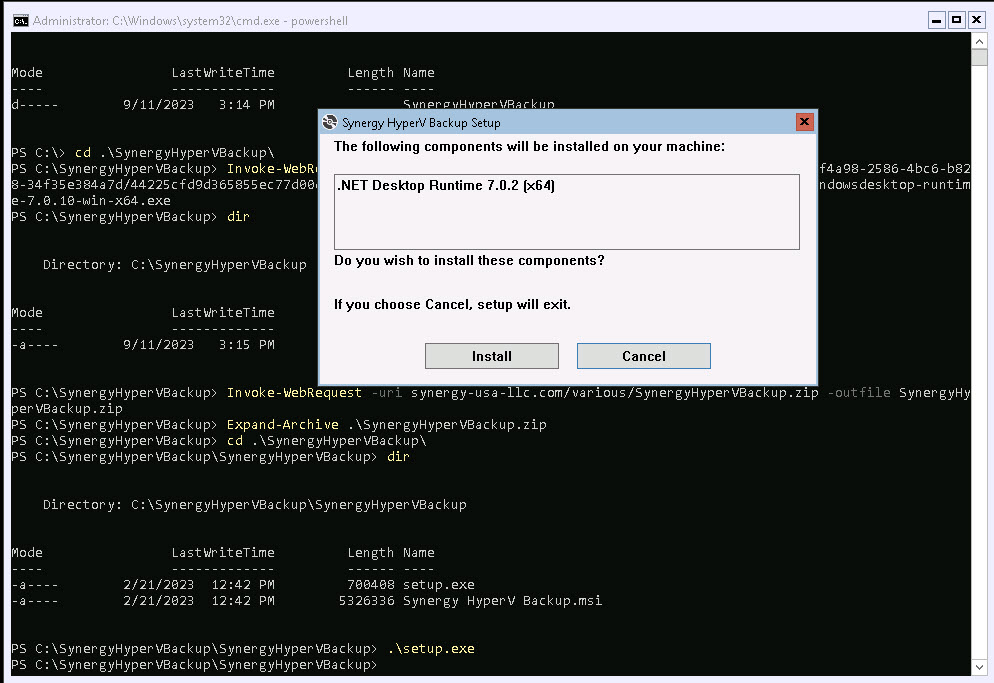
In case you have an issue with .Net Desktop:
Download manually the .NET desktop Ver. 7 from Microsoft:
Invoke-WebRequest -uri download.visualstudio.microsoft.com/download/pr/747f4a98-2586-4bc6-b828-34f35e384a7d/44225cfd9d365855ec77d00c4812133c/windowsdesktop-runtime-7.0.10-win-x64.exe -outfile windowsdesktop-runtime-7.0.10-win-x64.exe
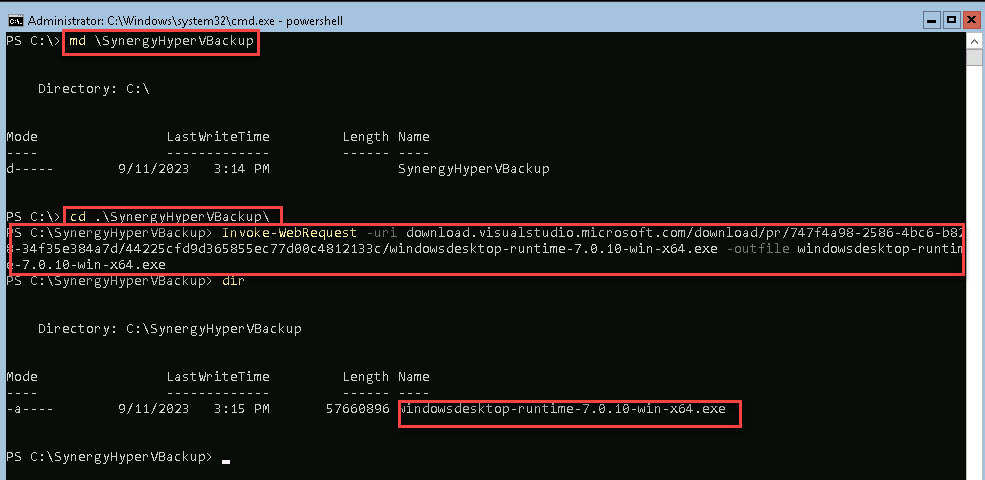
And install it as usual.
This is how you can setup the email settings on each profile:
Yes, end of October 2021 there a was a worldwide supply chain attack to multiple maritime companies via Danaos Management Consultants.
The company kept a reverse SSH tunnel from clients to their office for providing remote support and updates.
The hackers breached their main server and were able to access clients’ servers via the SSH. They were able to encrypt data, which in this incident were emails. They even stopped and encrypted the main Oracle database too.
The client’s server was a Linux VM running on a Hyper-V Server. The encryption started around Saturday midnight.
Our client’s latest backup was completed early Saturday morning.
We were informed Sunday morning and were able to bring everything back online by the same Sunday evening.
Due to the Hyper-V isolation (as designed in advance) no backups were harmed.
Monday morning was business as usual for the client and no one even knew what had happened during the weekend.
After the incident we added more backups jobs and especially an Offline one with retention enabled.
https://www.itgovernance.eu/blog/en/cyber-attacks-and-data-breaches-in-review-november-2021
Email credentials are saved as encrypted in the configuration file.
Task schedule credentials are not saved in the configuration file.
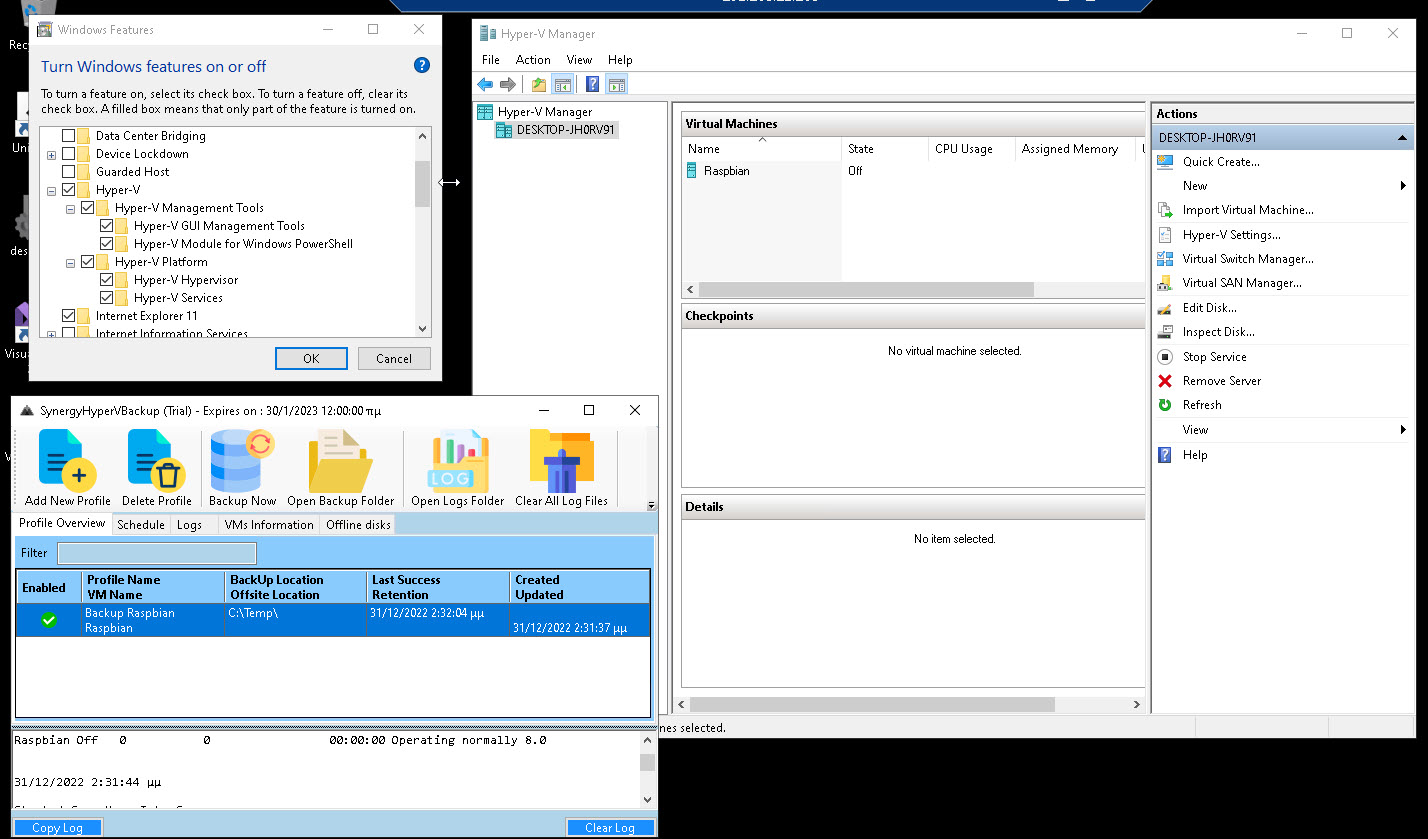
Synergy Hyper-V backup can run on a Windows Server Core/Hypervisor (Strongly Suggested):
Or it can run on a Windows Server with Hyper-V as a feature:
Start a PowerShell session and paste:
Invoke-WebRequest -uri download.visualstudio.microsoft.com/download/pr/747f4a98-2586-4bc6-b828-34f35e384a7d/44225cfd9d365855ec77d00c4812133c/windowsdesktop-runtime-7.0.10-win-x64.exe -outfile windowsdesktop-runtime-7.0.10-win-x64.exe
And install it as usual.
Follow the next two Steps:
Contact us in case of an issue.
We upload/check all of our files with VirusTotal:
SynergyHyperVBackup.zip:
https://www.virustotal.com/gui/file/63602dc930fe3370ed0c1a7d24bb261db7156d43a720a2a2878e41e6f3b4258a
SynergyHyperVBackup.exe:
https://www.virustotal.com/gui/file/e0500eb6f10bbba9d846e1b37ba3d90db41a0f4ba6d94484035d88414f7d0811
SynergyHyperVBackup.dll:
https://www.virustotal.com/gui/file/3ef5f4e9d43e525405b95ca8e73f65c74e2c2583a4e6e32549e4910dba2054d3
Microsoft Hyper-V Server 2019 is a free product that delivers enterprise-class virtualization for your datacenter and hybrid cloud. Microsoft Hyper-V Server 2019 provides new and enhanced features that can help you deliver the scale and performance needs of your mission-critical workloads.
Detailed instructions can be found here:
https://www.youtube.com/watch?v=_j88dLq7Wr0&t=11s
Requirements can be found here:
https://learn.microsoft.com/en-us/windows-server/virtualization/hyper-v/system-requirements-for-hyper-v-on-windows
You can download the ISO from here:
https://www.microsoft.com/en-us/evalcenter/evaluate-hyper-v-server-2019
Installation Guidelines
- Upon installation you will be prompted to activate.
- A product key is not required.
There is a great free tool you can use, which we highly recommend:
Probus IT Home – Hyper-V Manager ProHVM and more… (probus-it.com)
After a client’s power failure where the UPS failed to properly shutdown the Hyper-V Server, VMs were not able to start.
See below for the error we got every time we tried to start a VM:
Start-vm : ‘win-8-mngmt’ failed to restore virtual machine state. (Virtual
Machine ID B790B331-90AD-4D68-B2B4-34B604F849A2)
Virtual machine ‘win-8-mngmt’ could not be started because the hypervisor is
not running (Virtual machine ID B790B331-90AD-4D68-B2B4-34B604F849A2).
the following actions may help you resolve the problem:
(1) Verify that the processor of the physical computer has a supported version
if hardware-assisted virtualization.
(2) Verify that hardware-assisted virtualization and hardware-assisted data
execution protection are enabled in the BIOS of the physical computer. (If
you edit the BIOS to enable either setting, you must turn off the power to the
physical computer and then turn it back on. Resetting the physical computer
is not sufficient.)
(3) If you have made changes to the Boot Configuration Data store, review these
hanges to ensure that the hypervisor is configured to launch automatically.
All VMs were on a saved status and were not able to start.
The Hyper-V’s version was 2012R2.
For our case it seemed that updates that were already installed and run after the reboot of the server created the problem:
The following updates caused the issue: KB5009624 and KB5009624.
So here it is how to uninstall them from command line:
wusa /uninstall /kb:5009624

wusa /uninstall /kb:5009595
Just to be on the safe side, download and install hotfix KB5010794 which fixes this bug.
You must download it manually from the Microsoft Update Catalog.
Download and install from within Hyper-V from this link:
https://www.catalog.update.microsoft.com/Search.aspx?q=KB5010794
In case you want to remove and re install the hyper-V feature use the following Power Shell commands:
Remove-WindowsFeature -Name Hyper-V

Install-WindowsFeature -Name Hyper-V
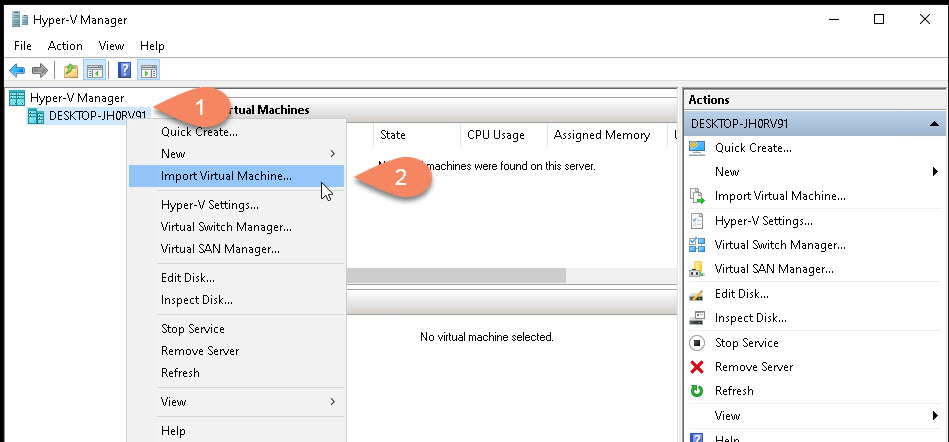
Start your Hyper-V Manager , right click over your server and select “Import Virtual Machine”:
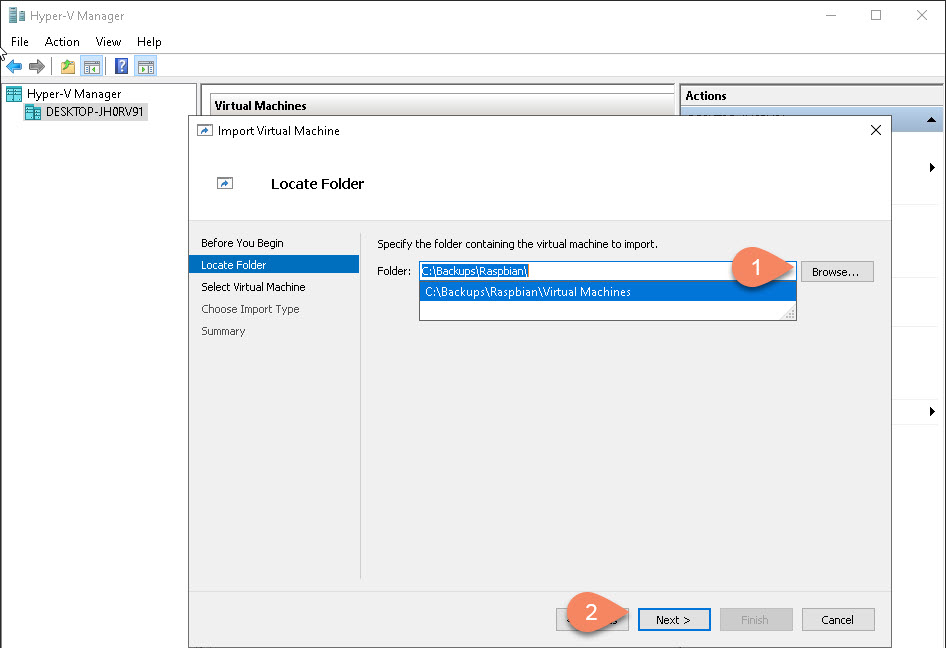
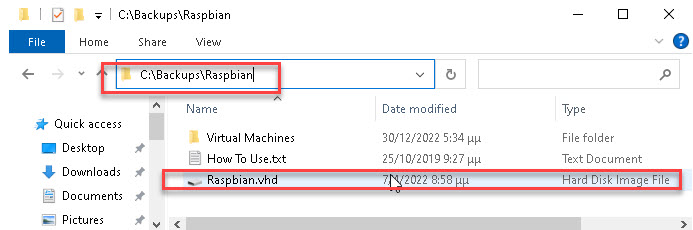
Browse to the location of the backup folder:
Select the Virtual Machine to Restore:
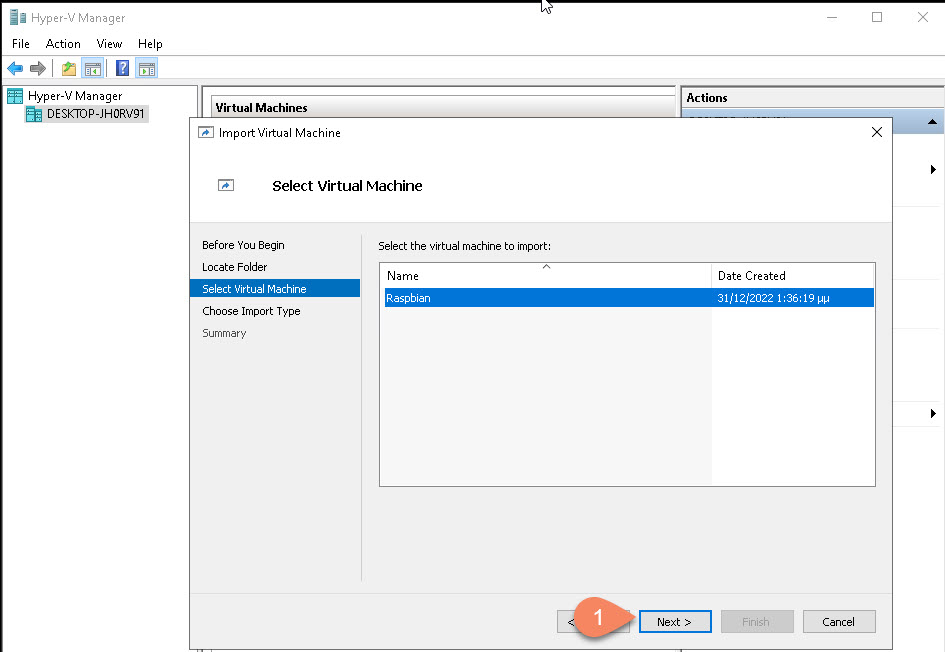
Select “Register…” when you restoring to a new server or “Restore…” for restoring to the same server:

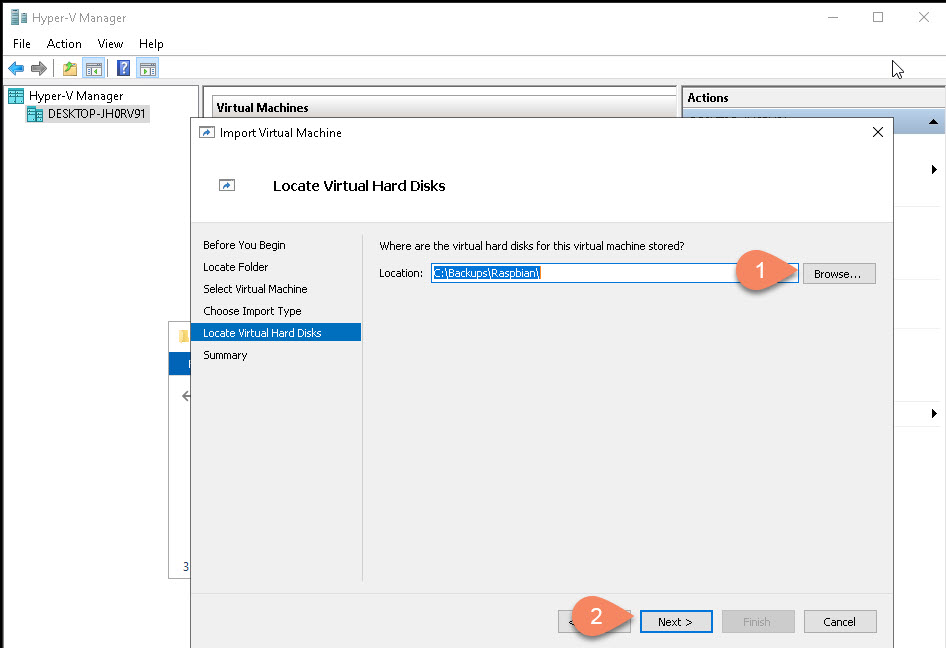
This is a bit tricky, first locate where your Virtual Disks are located:
Then select the same folder:
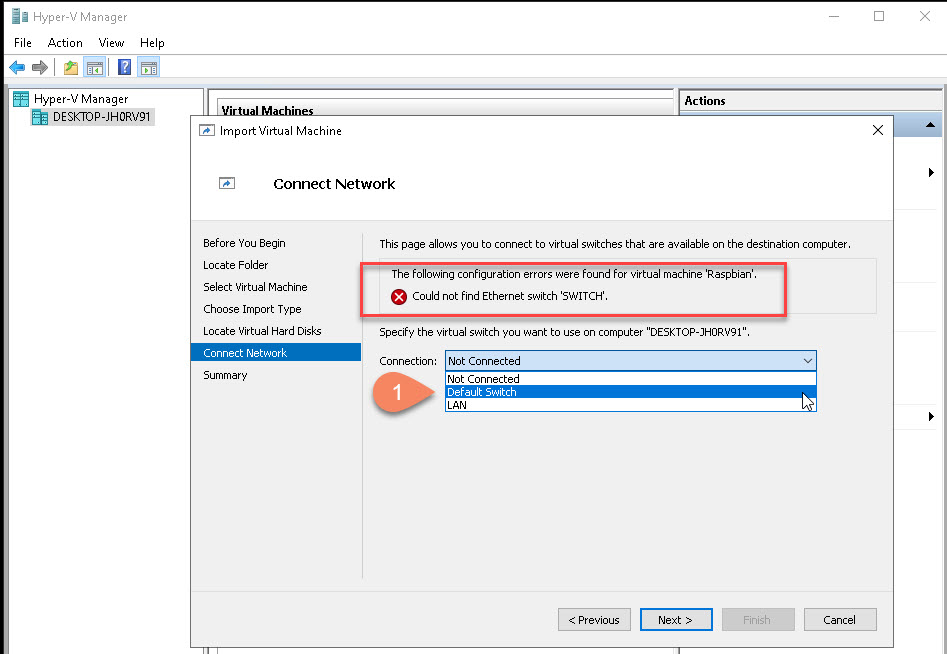
If you get a similar error just select the “Default Switch”:
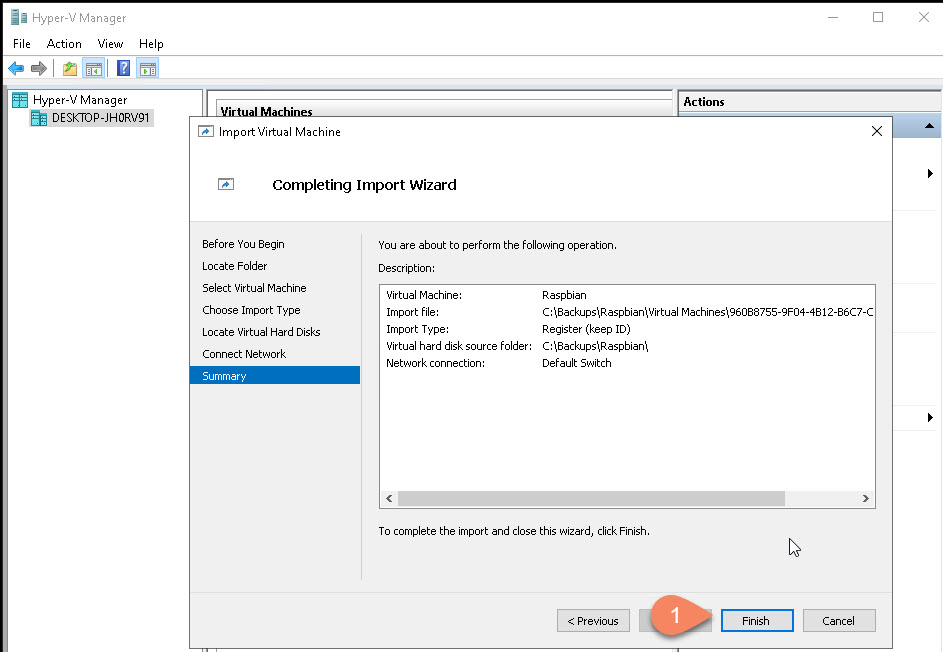
Click “Finish” to start the restore:
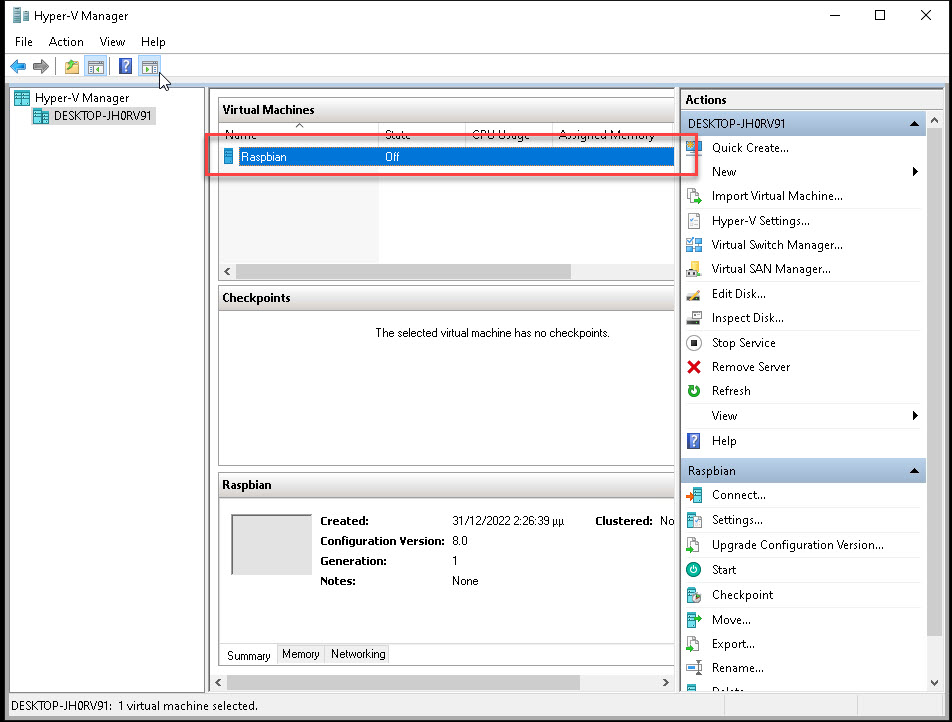
Your VM is now restored/registered to your Hyper-V:
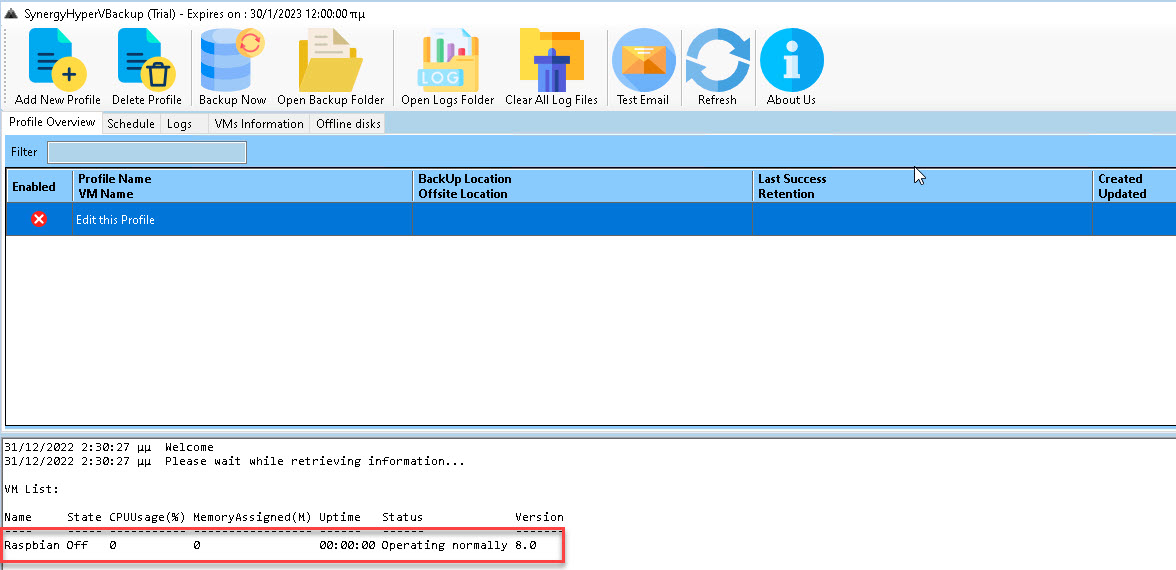
And it’s also visible from Synergy HyperV Backup:
Import-VM cmdlet. If the VM’s configuration files exist on a connected volume, you can perform a “Register in-place” of the VM, which assumes the correct file structure is already in place.
Here’s a basic example of the PowerShell command for registering a VM:
Import-VM -Path 'path_to_your_vmcx_file.vmcx' -Register'path_to_your_vmcx_file.vmcx' with the actual path to your VM’s .vmcx file. This command registers the VM located at the specified path without copying the files, making it suitable for situations where the VM is already located on the destination server’s storage.
Get-WinEvent -FilterHashtable @{ LogName = 'System'; Id = 41, 1074, 6006, 6605, 6008; } | Format-List Id, LevelDisplayName, TimeCreated, Message
At the prompt, type the following command, and then press Enter:
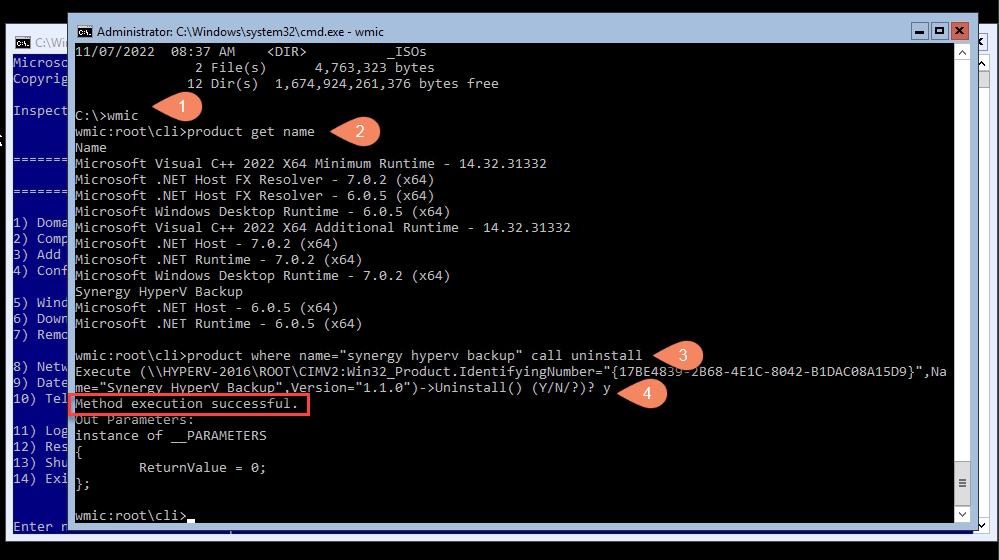
wmic
You’ll now see the wmic:root\cli> prompt in the console. This means you can now use Windows Management Instrumentation (WMI) operations.
Next, you’ll want a list of the programs installed on your computer. Getting this list is essential because you must provide an accurate product name to successfully execute the uninstall command.
Type the following command to get the list:
product get name
Find the name of the program you want to uninstall from the list. You can uninstall the program by running this command:
product where name=”synergy hyperv backup” call uninstall
We checked one of our old Hyper-V Servers (Hypervisor mode) using Nessus and we came up with the following issue:
Remote Desktop Protocol Server Man-in-the-Middle Weakness
Description
The remote version of the Remote Desktop Protocol Server (Terminal Service) is vulnerable to a man-in-the-middle (MiTM) attack. The RDP client makes no effort to validate the identity of the server when setting up encryption. An attacker with the ability to intercept traffic from the RDP server can establish encryption with the client and server without being detected. A MiTM attack of this nature would allow the attacker to obtain any sensitive information transmitted, including authentication credentials.
This flaw exists because the RDP server stores a publicly known hard-coded RSA private key. Any attacker in a privileged network location can use the key for this attack.
Solution
– Force the use of SSL as a transport layer for this service if supported, or/and
– On Microsoft Windows operating systems, select the ‘Allow connections only from computers running Remote Desktop with Network Level Authentication’ setting if it is available.
Plugin Details
Severity:Medium
ID:18405
Version:1.34
Type:remote
Family:General
Published:June 1, 2005
Modified:August 24, 2022
For more info here: https://www.tenable.com/plugins/nessus/18405
So here is how you can fix it. Issue the following command from Powershell:
(Get-WmiObject -class “Win32_TSGeneralSetting” -Namespace root\cimv2\terminalservices -ComputerName $env:computername -Filter “TerminalName=’RDP-tcp'”).SetUserAuthenticationRequired(1)
(make sure double quotes are properly pasted in your command line)
You can achieve this using PowerShell with the Set-VM cmdlet. The command to mark a VM to auto-start is:
Set-VM -Name ‘Your_VM_Name’ -AutomaticStartAction Start
To view the current settings for all VMs, you can use:
Get-VM | Select-Object Name, AutomaticStartAction
If you encounter an issue for reasons that are not immediately clear, you can proceed with the following steps:
Step 1:
Save the following powershell script to a location, for exampke : c:\scripts\StartYourVMName.ps1
# Wait for 90 seconds
Start-Sleep -Seconds 90
# Start the Hyper-V VM
Start-VM -Name YourVMName
Step 2.
Create a task schedule, from command line, to start the script when the server starts. It will run whether the admin logs or not:
schtasks /create /tn “StartYourVMName” /tr “powershell.exe -File C:\Scripts\StartYourVMName.ps1” /sc onstart /RU “administrator” /RP “password”
Reboot your server, and your virtual machine will start 90 seconds following the operating system’s startup.
Hyper-V lacks a built-in feature comparable to VMware’s boot order functionality. So here is how to do the same:
Step 1.
Save the following command to PowerShell script, for example c:\scripts\VMStartOrder.ps1
Change delay and VM names as you wish.
# Start the first VM
Start-VM -Name ‘VM1’
# Wait for 30 seconds
Start-Sleep -Seconds 30
# Start the second VM
Start-VM -Name ‘VM2’
# Wait for another 30 seconds
Start-Sleep -Seconds 30
# Start the third VM
Start-VM -Name ‘VM3’
Step 2.
Create a schedule task from command line. It will run whether the admin logs or not:
schtasks /create /tn “VMStartOrder” /tr “powershell.exe -File ‘C:\scripts\VMStartOrder.ps1′” /sc onstart /RU “administrator” /RP “password”
Reboot your server to test.